Setting up Hugo automatic deployment to Github with Wercker
Recently, I again migrated my blog from Pelican to Hugo. So till now, I have experimented with Wordpress, Jekyll, Pelican, and Hugo. Without any doubt, Hugo is the simplest to set up. This time, I have setup Hugo in Windows, as I think, in my system, I reinstall Windows OS much less frequently than the Linux. So that way, it will be less painful for me to set up the blog again.
In this post, I will list all the process which I used to set up automatic deployment of Hugo generated site to Github pages using Wercker. In the beginning, I was trying to use Travis-CI, but then I read about Wercker somewhere. I was impressed with the integration of Wercker with Hugo and the availability of many its community-generated "steps" for the build and deploy process.
Hugo Docs already have a fantastic documentation for setting up Hugo with Wercker, but it is outdated. Other documentations available on-line is also obsolete. Wercker has changed many functionalities in its platform, which made it difficult for me to set up things correctly. But after hours of trial and error cycle, I was able to build and deploy my static files successfully.
Here I would like to share the issues I encountered and the tweaks I've made. The source codes of this site can be found here .
Project Pages or User Pages
Two types of sites are supported on Github Pages, User Site, and Project Site.
User Sites will serve the files stored in the master branch of the repository
https://github.com/user_name/user_name.github.io at the address
https://user_name.github.io. For the Project sites, everything under the
gh-pages will be served at the address https://repo_name.github.io.
My site is a User site, so I wanted all the static files to be saved in the
master branch. As Hugo generates all the static files under public directory,
I needed another branch to store my source files. So my made a new branch
source, which will save all the source files for my blog. Don't forget to
remove the .git folder from the theme folder. Otherwise, the build will fail
at a later stage. You can try using the git submodule feature to avoid this
issue. I created a repository yash2696.github.io in Github also.
git init                       #initialized git repository in site root
git checkout -b source         #created new branch source
git remote add origin [https://github.com/yash2696/yash2696.github.io](https://github.com/yashhere/yashhere.github.io)
git add .
git commit -m "Initial Commit"
git push origin source
Then I initialized my master branch as a orphan branch.
git checkout --orphan master
git rm -rf .
rm -f '.gitignore'
echo "#Your repository name" > README.md
git add README.md
git commit -a -m "Initial Commit"
git push origin master
Automatic deployment using Wrecker
It is straightforward to build a Hugo site. Invoke hugo command under your
root directory, Hugo will create a public folder which will contain all your
content, static files, etc. Then push this directory to Github, and voila, your
site is up!
What if a single push to source branch can trigger all the process for you
automatically. Here the magic of continuous integration(CI) comes into the
picture. A free Wercker account can be easily created and hooked to the Github
account and a new application from a chosen repository. After setting up
everything, a push to the development branch will automatically trigger the
Wercker. One of the most significant advantages of using Wercker is its
extensive collection of user-made and well documented "steps". In this post, I
will use two steps, build hugo and deploy to Github.

The first task is to create a wercker.yml file. It will tell Wercker which all
actions, it should perform. Here is my
wercker.yml
for reference. In this, I have used two pipelines, build and deploy. Please
follow the official docs for the more detailed steps. I will list all the
problems which I face while setting up things properly.
Build
Following the official guide, I used this step to trigger Hugo to build HTML pages. I had already removed git repository information from the theme folder, so this step finished successfully. If you haven't, you may add the following piece of code in your build step.
- script:
    name: install git
    code: |
        apt-get update
        apt-get install git -y
    - script:
        name: initialize git submodules
        code: |
            git submodule update --init --recursive
Deploy
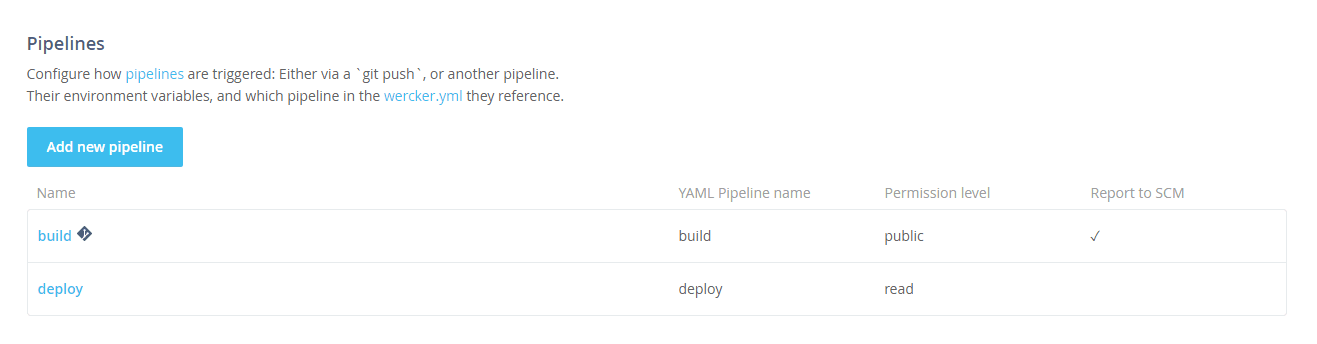
There is no concept named "Add Deploy Target" in Wercker as of now. Most of the on-line tutorials follow this process which is outdated. Now Wercker uses a concept called "Workflows in Pipelines".
For new interface, even if you add a deploy stage in the wercker.yml, you will
have to create a new pipeline deploy under the Workflows tab. After creating
the pipeline, the "YML Pipeline name" must be set to the deploy stage name,
which in this case is deploy.
In deploy stage, I used this
step (broken
link) to deploy the built site to Github. Each pipeline starts from scratch, so
for the deploy pipeline, the git package needs to be installed again. One also
has to set up the environment variable $GIT_TOKEN to each pipeline, acquired
from Github setting.
You need to generate a new access token for your deploy stage from Github
settings.
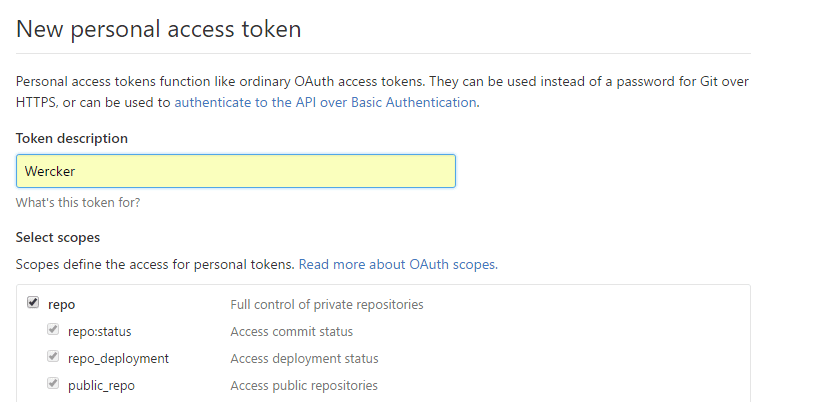
After adding the deploy stage, add the token you obtained from the Github to Environmental Variables in deploy pipeline.

On the next push to your development branch, Wercker will automatically build the site and deploy it on Github Pages.